OLED Display
Time to interface a 0.96″ graphical OLED I2C Display with a Arduino Uno! This tiny OLED Display is useful in displaying various data from sensors, graphics and many more. In this tutorial we have used Adafruit SSD1306 and GFX library.
The basic idea for taking this project was that the students get the exposure of OLED which is growing today exponentially from large UHD TVs to Small wearable devices.
Components required :
1. Arduino Uno R3
2. Arduino Cable
3. OLED (128*64)
4. Male to male Jumper wires
5. Breadboard
Connections:
Refer the schematics for the connections.
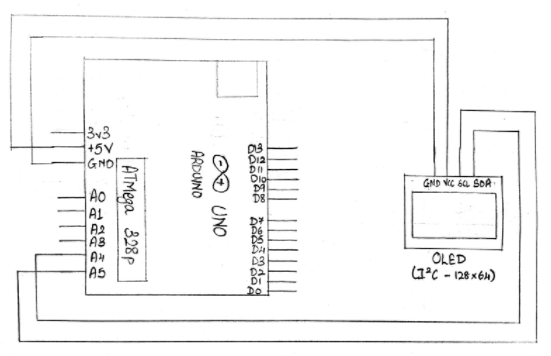
Steps For Connections:
For OLED:
Connect the Vcc pin to the Vcc (+5V) of the Arduino.
Connect the GND pin to the GND of the Arduino.
Connect the SDA pin to the analog pin – ‘A4’ of the Arduino.
Connect the SCL pin to the analog pin – ‘A5’ of the Arduino.
Code:
Include Wire.h library for I2C communication , the Adafruit SSD1306 library for monochrome 128*64 oled which we will be using and also Adafruit GFX which is the core library for the graphics and all the other graphics library are derived from this only.
Initialize the reset pin as 4 (In our module we don’t have a pin for reset so we don’t connect anything to it , but if your module has a reset pin then connect it to pin 4 of arduino , The reason why we are using this is because the library which we are using is a standard library and takes the oled_reset as its argument for initializing the OLED)
Then we have defined the parameters for the visuals like the font size and the max pixels in width and height(Here though we have 128*64 Oled , the max count is 127 for width and 63 for height as in the code it is counted from 0 and not from 1)
void setup
Initialize the OLED by giving the address for I2C communication and clear the screen and the buffer.
Then we have just displayed the empty function And then we have passed the boolean argument False for the function setTextWrap , this means that if our string is too long then it will allow to go out of the string . If we make it true then our complete string will get fit in the screen but that is not our requirement.
void splash:
This is the function where we will set our data to be displayed. So initially we will clear all the data on the screen and in the buffer . Then we will set the text color as White .(Our OLED is monochrome , so only option is white but if we have a colour OLED , then we can use other colour for text color and also we can change the background in that case)
Then we have passed the data which we want to print along with 2 other arguments in the function centerPrint . out of the 2 , the first argument is the pixel height from where to start i.e in accordance with the y-axis and the second argument is for the size of the data .The function centerPrint is made below.
Then we have called the inbuilt function display of the library Adafruit ssd1306 by display.display
Here first display is the name of the class and second display is the name of the function which we are calling.
Then we have given a delay of 10 sec
-void loop:
We have just called our own made function splash in the void loop.
void centerPrint(char *text, int y , int size):
This was the function which was called in the splash function.
Here we can see that our function takes 3 arguments . The first argument is the char which takes the string which we want to display , 2nd argument is the point on the y-axis from where to start and the 3rd argument is for the size.
In this function we have first called the inbuilt function for setting the size of our text i.e setTextSize
Then we set the cursor position from where it will start the text.
This is done by using the inbuilt function setCursor which takes 2 arguments (i.e the x coordinate and the y coordinate). For x coordinate to print in center we have used a small formula , where it will first divide the max screen pixels on the x -axis (It is 128 in our case ) by 2 . Then the length of our string is multiplied by 6 and again multiplied by the size argument passed by us and then divided by 2 . After this both are subtracted and the difference of both of them is considered as the x co-ordinate and the y coordinate is passed directly which was our 3rd argument of centerPrint function.
Steps for Compiling Program:
1. Click on ‘Sketch’ on Menu bar.
2. Select ‘Verify/Compile’.
(or)
Press Ctrl + R
(or)
Click on the first button just below the menu bar. (Button with a tick)
Steps for Uploading Program:
1. Click on ‘Tools’ on the Menu Bar.
2. Go to ‘Board’ and select whichever Arduino you are using. Here, Arduino/Genuino Uno.
3. Go to ‘Port’ and select the COM Port in which you have connected your Arduino Uno. You can check out your COM Port by going to Device Manager>PORTS(COM & LPT)
4. Go to Programmer and select ‘AVRISP’.
5. Now click on ‘Sketch’ on Menu Bar.
6. Select Upload.
(or)
Press Ctrl + U
(or)
Click on the button next to the ‘verify/compile’ button below the Menu Bar. (Button with a right arrow).
If you are using an USBasp cable instead of Arduino Cable, then Choose USBasp in the Programmer options.
And then go to ‘Sketch’ and select ‘Upload using Programmer’ (or) press Ctrl+Shift+U.