Temperature and Humidity Displayer
The temperature sensor is one of the most popular sensor among the electronic hobbyists as these sensor are cheap and are easy to interface. Here we are using DHT 11 as temperature and humidity sensor.
The DHT22 is the more expensive version which obviously has better specifications. Its temperature measuring range is from -40 to +125 degrees Celsius with +-0.5 degrees accuracy, while the DHT11 temperature range is from 0 to 50 degrees Celsius with +- 2 degrees accuracy. Also the DHT22 sensor has better humidity measuring range, from 0 to 100% with 2-5% accuracy, while the DHT11 humidity range is from 20 to 80% with 5% accuracy. There are two specification where the DHT11 is better than the DHT22. That’s the sampling rate which for the DHT11 is 1Hz or one reading every second, while the DHT22 sampling rate is 0,5Hz or one reading every two seconds and also the DHT11 has smaller body size. The operating voltage of both sensors is from 3 to 5 volts, while the max current used when measuring is 2.5mA. Ok now let’s see how these sensors actually work. They consist of a humidity sensing component, a NTC temperature sensor (or thermistor) and an IC on the back side of the sensor
The main objective behind the Project is to learn how to interface the Temperature sensor with the arduino and display the room temperature on the serial monitor or you can use the readings for the controlling the fan or AC by simply adding if-else loop according to the reading of the DHT11.
List Of Components:
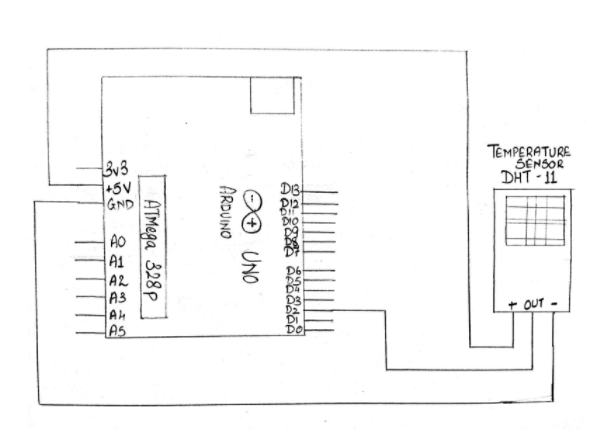
1. Arduino Uno R3
2. Arduino Cable
3. DHT11 Module
4. Male to male Jumpers
5. Breadboard
Connections:
Refer to the Schematic for connections.
Steps For Connections:
Connect the ‘+’ pin of the BH1750 to the Vcc (+5V) of the Arduino.
Connect the ‘-’ pin of the BH1750 to the GND of the Arduino.
Connect the D (data) pin of the BH1750 to the digital pin – 2 of the Arduino.
Code:
DHT.h
Steps to add a library :
1. Go to ‘Sketch’
2. In the drop down menu go to ‘Include Library’
3. Select Manage Library
4. Type the name of the library.
5. Click the ‘Install’ button to install the library.
6. The library is now installed and you can use it now.
With the libraries there comes few example codes or say test codes.
Steps to open an example code.
1. Go to ‘File’ menu
2. Select ‘Examples’
3. Drop down menu occurs, move your pointer to the bottom of the drop down menu and reach the end. There you will find the example codes of the latest library that you installed.
4. Click on any one and you will find the code on your screen. You can even modify it.
5. Here, in this program, ‘DHTtester’ example code is used.
Declaration
1. include the DHT library.
2. #define indicates that the variable used is assigned to the given Arduino pin. It is just another way to declare a variable.
3. As we are using DHT11, so we uncommented the DHTTYPE DH11 and commented the other 3.
4. Using the DHT function we initialise the the DHT sensor where the two input parameters are the pin to which the DHTpin is connected to arduino and the DHTTYPE.
void setup
1. To enable Serial Communication, we initialise by Serial.begin setting the baud rate to 9600
2. Just to test whether the Serial Communication is working or not we just add a Text in the setup function itself which would display first when your code starts executing. It is NOT mandatory though.
3. dht.begin() is also used for initializing the sensor.
-void loop:
1. A delay of 2 second is given as the sensor is a slow one and takes time to take readings. So to keep it accurate a delay is added.
2. The three variables h,t, and f are used to store data of the humidity and temperature measurement.
3. In dht.readTemperatue(), if we pass the parameter is ‘true’ then the temperature is calculated in Fahrenheit.
4. isnan() is a function which returns true if the variable holds something which is not a number.
5. So here we check whether the three variables in which we are storing data is a number or not.
6. There is also a function where you can find the heat index but we have commented it to avoid complexity.
7. We finally print the values using Serial.print
8. Further you can also use this values to turn on or off an led or say a fan by using if – else conditions.
Steps for Compiling Program:
1. Click on ‘Sketch’ on Menu bar.
2. Select ‘Verify/Compile’.
(or)
Press Ctrl + R
(or)
Click on the first button just below the menu bar. (Button with a tick)
Steps for Uploading Program:
1. Click on ‘Tools’ on the Menu Bar.
2. Go to ‘Board’ and select whichever Arduino you are using. Here, Arduino/Genuino Uno.
3. Go to ‘Port’ and select the COM Port in which you have connected your Arduino Uno. You can check out your COM Port by going to Device Manager>PORTS(COM & LPT)
4. Go to Programmer and select ‘AVRISP’.
5. Now click on ‘Sketch’ on Menu Bar.
6. Select Upload.
(or)
Press Ctrl + U
(or)
Click on the button next to the ‘verify/compile’ button below the Menu Bar. (Button with a right arrow).
If you are using an USBasp cable instead of Arduino Cable, then Choose USBasp in the Programmer options.
And then go to ‘Sketch’ and select ‘Upload using Programmer’ (or) press Ctrl+Shift+U.